Configure Algo node (TBD)
Project Setup Screen
Selecting or loading a project will take you to the Project Setup Screen. In this screen you can modify the system setup and add or delete sensors.
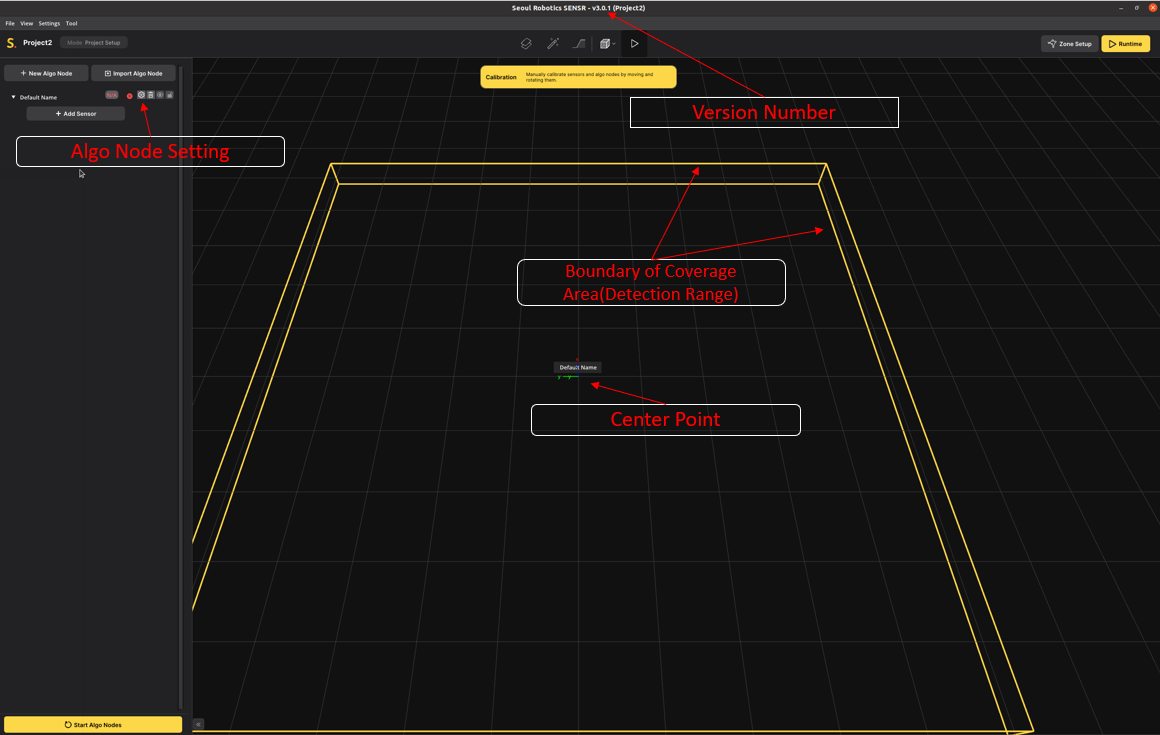
Algo Node Settings
An 'Algo Node' in SENSR processes the raw sensor data to transform into object tracking data. This data is sent to the master node, which will combine all incoming data and act as the front-end, monitoring and output server. The algo node can be either local (i.e. on the same machine as the master node) or remote.
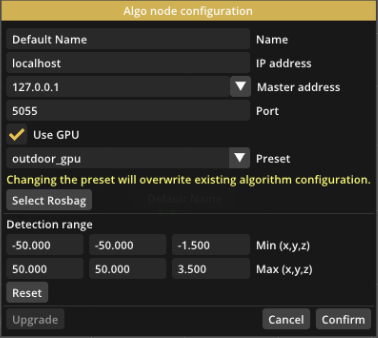
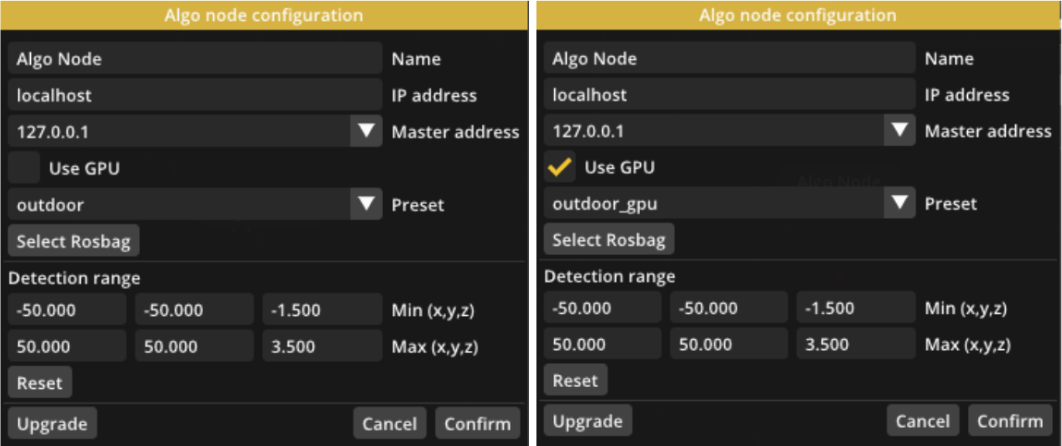
To change the configuration of an algo node, click the gear icon next to the algo node in the project set-up panel. This will open up a window to configure the algo node.
Algo node configuration for single-device:
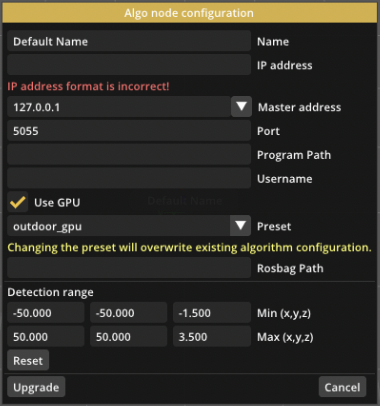
Algo node configuration for remote algo node:
Name
You can change the name of an algo node to something easily recognizable. The name will be displayed as a floating label in the 3D viewport.
IP Address
To connect to a remote algo node, change the IP address of the node to the IP address of the remote machine. Make sure the network settings and firewall are configured correctly to allow the two computers to communicate.
If you use only a single computer, you must enter ‘localhost’ in the IP address field. You will notice that the ‘Binary Path’ and ‘Username’ fields will disappear as these are no longer necessary.
caution
When you setup multiple algo nodes, make sure that the IP address of each node is unique, unless you change the Port address of the node. Please refer to the Port address section if you wish to run multiple algo nodes in a single machine.
Master Address
In case the computer has multiple ethernet ports and network setups, you can choose the IP address that master node will use for the communication to the algo node(s). All currently assigned IP addresses will be available to choose from. If you run everything locally on a single computer, you can choose ‘127.0.0.1’.
caution
If you are running a remote Algo Node, make sure to set the Master network to the IP address of the ethernet adapter of the Master Server that the Algo Node is connected to.
For example, if the ethernet adapter of the Master Server that the Algo Nodes are connected to has IP 10.0.0.50, make sure to use that number in your local network settings. Do NOT use ‘127.0.0.1’ when running a remote Algo Node, you must select the specific IP address the Algo Node is connected to.
Port Address
To connect to a remote algo node, change the Port address of the node to any of unused port address of the remote machine. By default, the port used for internal communication between Master and Algo is 5055. If you wish to run multiple algo nodes in a single machine, each algo node must have same IP address but unique port number.
caution
Make sure to avoid using these reserved ports used by the program: 5050, 5051, 9080, 5056.
Program Path
The path of the algo node executable is located in the remote machine. The default path is: /home/<user>/sensr/bin/ , where <user> is the user login name of the Algo Node.
This option is not needed on a local machine algo node.
Username
Username of the remote machine. Master node uses SSH to launch the algo node in the remote machine. Make sure you follow the SSH authentication steps.
This option is not needed on a local machine algo node.
Use GPU
info
The GPU mode requires an NVIDIA based graphics card.
Enable GPU plug-in for the selected algo node. This option will only be available if you purchased the Deep Learning (DL) module of SENSR.
Preset
SENSR comes with a number of algorithm presets to fit a variety of situations. These can be split into normal presets and GPU presets (intended to work with the GPU plug-in).
For the normal presets, the two default presets are Indoor and Outdoor which work well in most use cases:
- The
Indoorpreset is optimized for a situation with level-ground, short range, and many objects moving around. - The
Outdoorpreset is optimized for outdoor, medium-long range settings and can track larger objects such as trucks or buses.
The GPU plug-in comes with the Outdoor GPU preset which works similar to the normal Outdoor preset but with advanced GPU-based AI/DL algorithms enabled to improve the tracking and classification performance. Note that presets intended for the GPU plug-in cannot be used without access to a GPU and the GPU plug-in feature must be enabled in the product license.
Additional presets will be made available in the future.
Custom presets can be created from the current algorithm settings. This can be useful for quickly applying custom settings to multiple nodes. To create a new custom preset, go to Runtime mode and open the Settings>AlgoNodeParameters window for the appropriate algo node. And click the Export as Preset… button to export the preset.
For SENSR to recognize the preset it needs to be imported. This can be done via the Import Preset… button in the algorithm preset management window under Settings.AlgoNodeParameters.ManagePresets in the Project Setup mode. From here custom presets can also be deleted.
To select a preset for a specific algo node, open the algo node configuration window for that algo node from the Project Setup panel and edit the Preset field. Note that changing a preset will reset all the parameter of that algo node from what user changed to the preset's default value.
tip
You can export Preset Change Log in txt file at File > Export Preset Change Report to look over preset changes. Please contact our support team with the txt file if you need any help about presets.
Rosbag Path
SENSR is able to process all supported sensors directly through usage of the manufacturer supplied sensor drivers that are packaged with SENSR. This is the most straightforward way to process sensor data and therefore the recommended method to use in a live situation.
In addition, SENSR supports playing ROS (Robot Operating System) rosbag files with PointCloud2 topics. This can be useful if raw data was recorded as a rosbag and you want to play it back later to test in the SENSR system.
Note that ROS generates very large files and is very intensive to process. For this reason SENSR comes with its own more efficient internal replay system.
Detection Range
This range indicates the total coverage area that SENSR will process for that algo node and attempt to track objects in. The larger this space, the more computing power is required, so it is recommended to keep this space as small as needed. This will be explained further in the setup and calibration tutorial section.
Detection Range
All lidar settings share the ‘Detection Range’ argument. This range limits the output range of the sensor. This can help with reducing noise from far away objects or limiting the range to conserve processing power. The detection range is specified in meters.
As an example of how to use this range: Say you have two sensors A and B that are spaced 50m apart from each other. An object that is 5m away from Sensor A will be clearly picked up by Sensor A, but a small error in calibration of Sensor B could see the same object in a different location, creating a ghost image. By reducing the Detection Range of Sensor B to 35m, any object that comes close to Sensor A will be ignored by B, ensuring that small errors in calibration do not cause problems.
As a general rule of thumb, for indoor applications with lots of obstructions, the Detection Range can often be reduced to as low as 25m for each sensor.
LiDAR Timestamp
By enabling this option, you are instructing the system to prioritize using the timestamp that is generated by the sensor. This requires the sensor to be timesynced through NTP, PTP or GPS. Please follow the instructions of your lidar sensor on how to enable this time synchronization mechanism. If the time difference between the sensor and the server exceeds a specific threshold, the server will overwrite the timestamp with local time.
As of 2.2.8 only Hesai and Livox are supported through this mechanism.
SENSR2. DL GPU Plug-In
SENSR comes with an optional GPU plug-in that can be activated with the proper product license for users who have access to a GPU on their algo nodes. The GPU plug-in provides SENSR with state-of-the-art AI algorithms that can greatly enhance the quality of the output. The GPU plug-in is automatically activated if it is included in the product license. With the plug-in enabled algo nodes can be configured to use the GPU algorithms by opening the Algo node configuration window and ticking the checkbox Use GPU. The preset will also need to be updated to an appropriate one as different presets are used with the GPU plug-in algo nodes. Any new algo nodes created while the GPU plug-in is enabled will automatically use it. To change the algo node to the standard mode you can similarly un-tick the checkbox and update the preset appropriately.
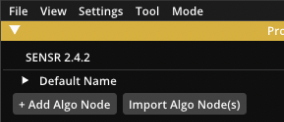
Algo Node Import
SENSR allows us to import algo nodes (and the sensors belonging to those nodes) from other projects. For example if you have two separate projects and want to combine them you can import one of them into the other instead of having to re-create everything from scratch.
The Import Algo Node(s) button can be found next to the button where for adding a new algo node called Add Algo Node.
Once the Import Algo Node(s) button is pressed a dialog box asks us to choose a project to import from. After selecting a valid project folder the algo nodes and sensor from that project are listed. Here we need to mark the check boxes of the algo nodes and sensors we want to import and then press the Continue button to proceed to the next step.
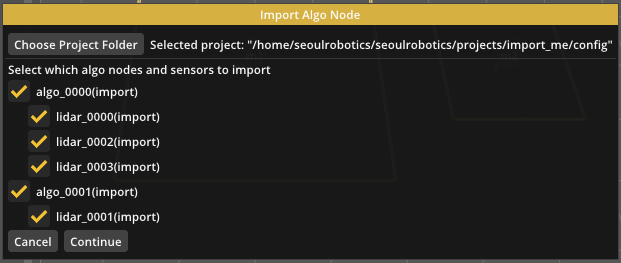
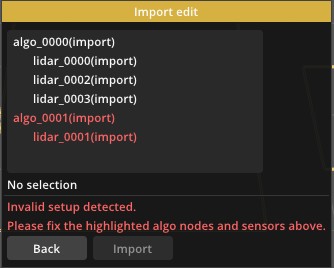
This brings us to the setup screen. Here we see a list of the algo nodes and sensors to be imported. If any of the algo nodes or sensors has a conflicting setup with the current project (e.g. same IP and/or port used by multiple algo nodes) they are colored red. To rectify this click on the algo node or sensor that is colored red and then click on the Edit button to transition into the setup screen for that algo node or sensor to fix the issues. Once all the problems are fixed (no red items remain) we can finally click the Import button to import these algo nodes (and sensors) into our current project.