Unbox Discovery kit
Step 1. Unboxing
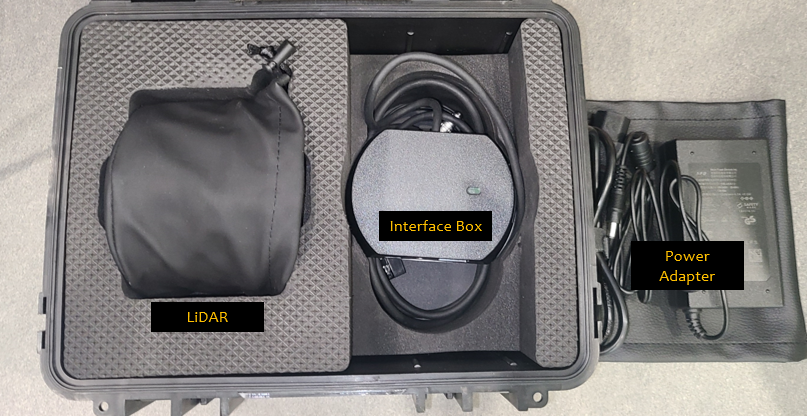
Please check if you have received the following items:
- LPU (Lidar Processing Unit)
Standard Discovery unit as our example:
it comes with a power supply.
- Sensor(Hesai lidar)
- Power / GPS cables
- Junction Box
- Sensor Cable
- Power Adapter (optional)
- Additional items you will need (not supplied)
  - Keyboard and Mouse (USB)
  - Monitor
  - Ethernet cables
Step 2. Power up the LPU
- Plug a LPU power adapter into LPU
- Plug your monitor into LPU
note
Note that the DP (DisplayPort) on the LPU is DP 1.0. Not all DP cables can convert from 1.X to 2.0 if your monitor only supports 2.0. If your DP cable does not give a signal on the monitor, find out if your monitor supports DP 1.X, then find a DP 1.0 - 2.0 cable or switch to DVI.
3. Plug your mouse and keyboard into the LPU 4. Press the power button on the LPU to test The Desktop will show the SENSR Manual, click to read. This guide will reference the manual frequently.
Step 3. Launch the SENSR software
To launch the SENSR software, do the following:
- Open a new terminal (
CTRL-ALT-T) - Enter
sr-launcher
In most cases, your Discovery will come with a pre-installed license. If a message pops up that a license does not exist, please follow the steps in Get activated license file to acquire and activate your license.
Once you are done, you will see New Project/Open Project buttons.
note
We recommend completing the tutorial from Calibration before connecting any live sensors to the system. This will help you understand what the behavior should be in a correctly set up environment.
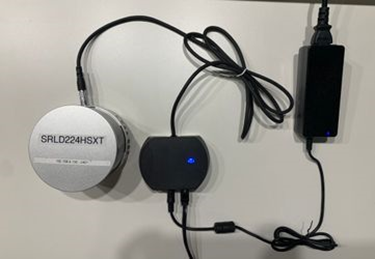
Step 4. Connecting the sensor
Connect your sensor cables as follows:
note
Make sure the Hesai's interface box's blue light is on
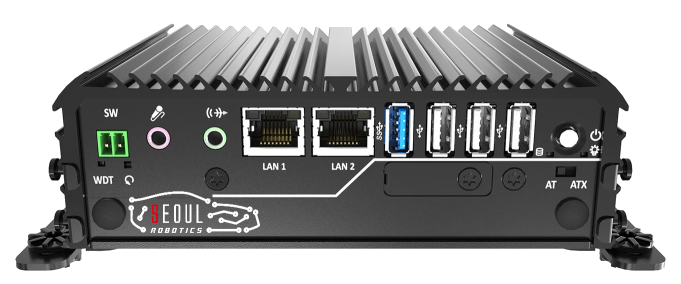
- Now plug the other end of the ethernet cable into LAN 2
- Power up the sensor. The sensor will spin up. It is possible for the sensor to make a grinding noise as it settles in. This is normal, but if this grinding noise persists for more than a day, please contact Seoul Robotics
- Check the ethernet connection on the LPU, you should see a green light and a blinking yellow light. This means the sensor is connected to and communicating with the LPU
Step 5. Setting up the network
Your Discovery LPU comes pre-configured with the correct network settings for your sensor, but in this section we will verify those settings.
You will notice the Discovery LPU has two ethernet ports, marked as ‘LAN 1’ and ‘LAN 2’. In the standard configuration ‘LAN 1’ is used for the internet connection and/or the office/site network and ‘LAN 2’ is used for the sensor connection. Your lidar has been connected to the LAN 2.
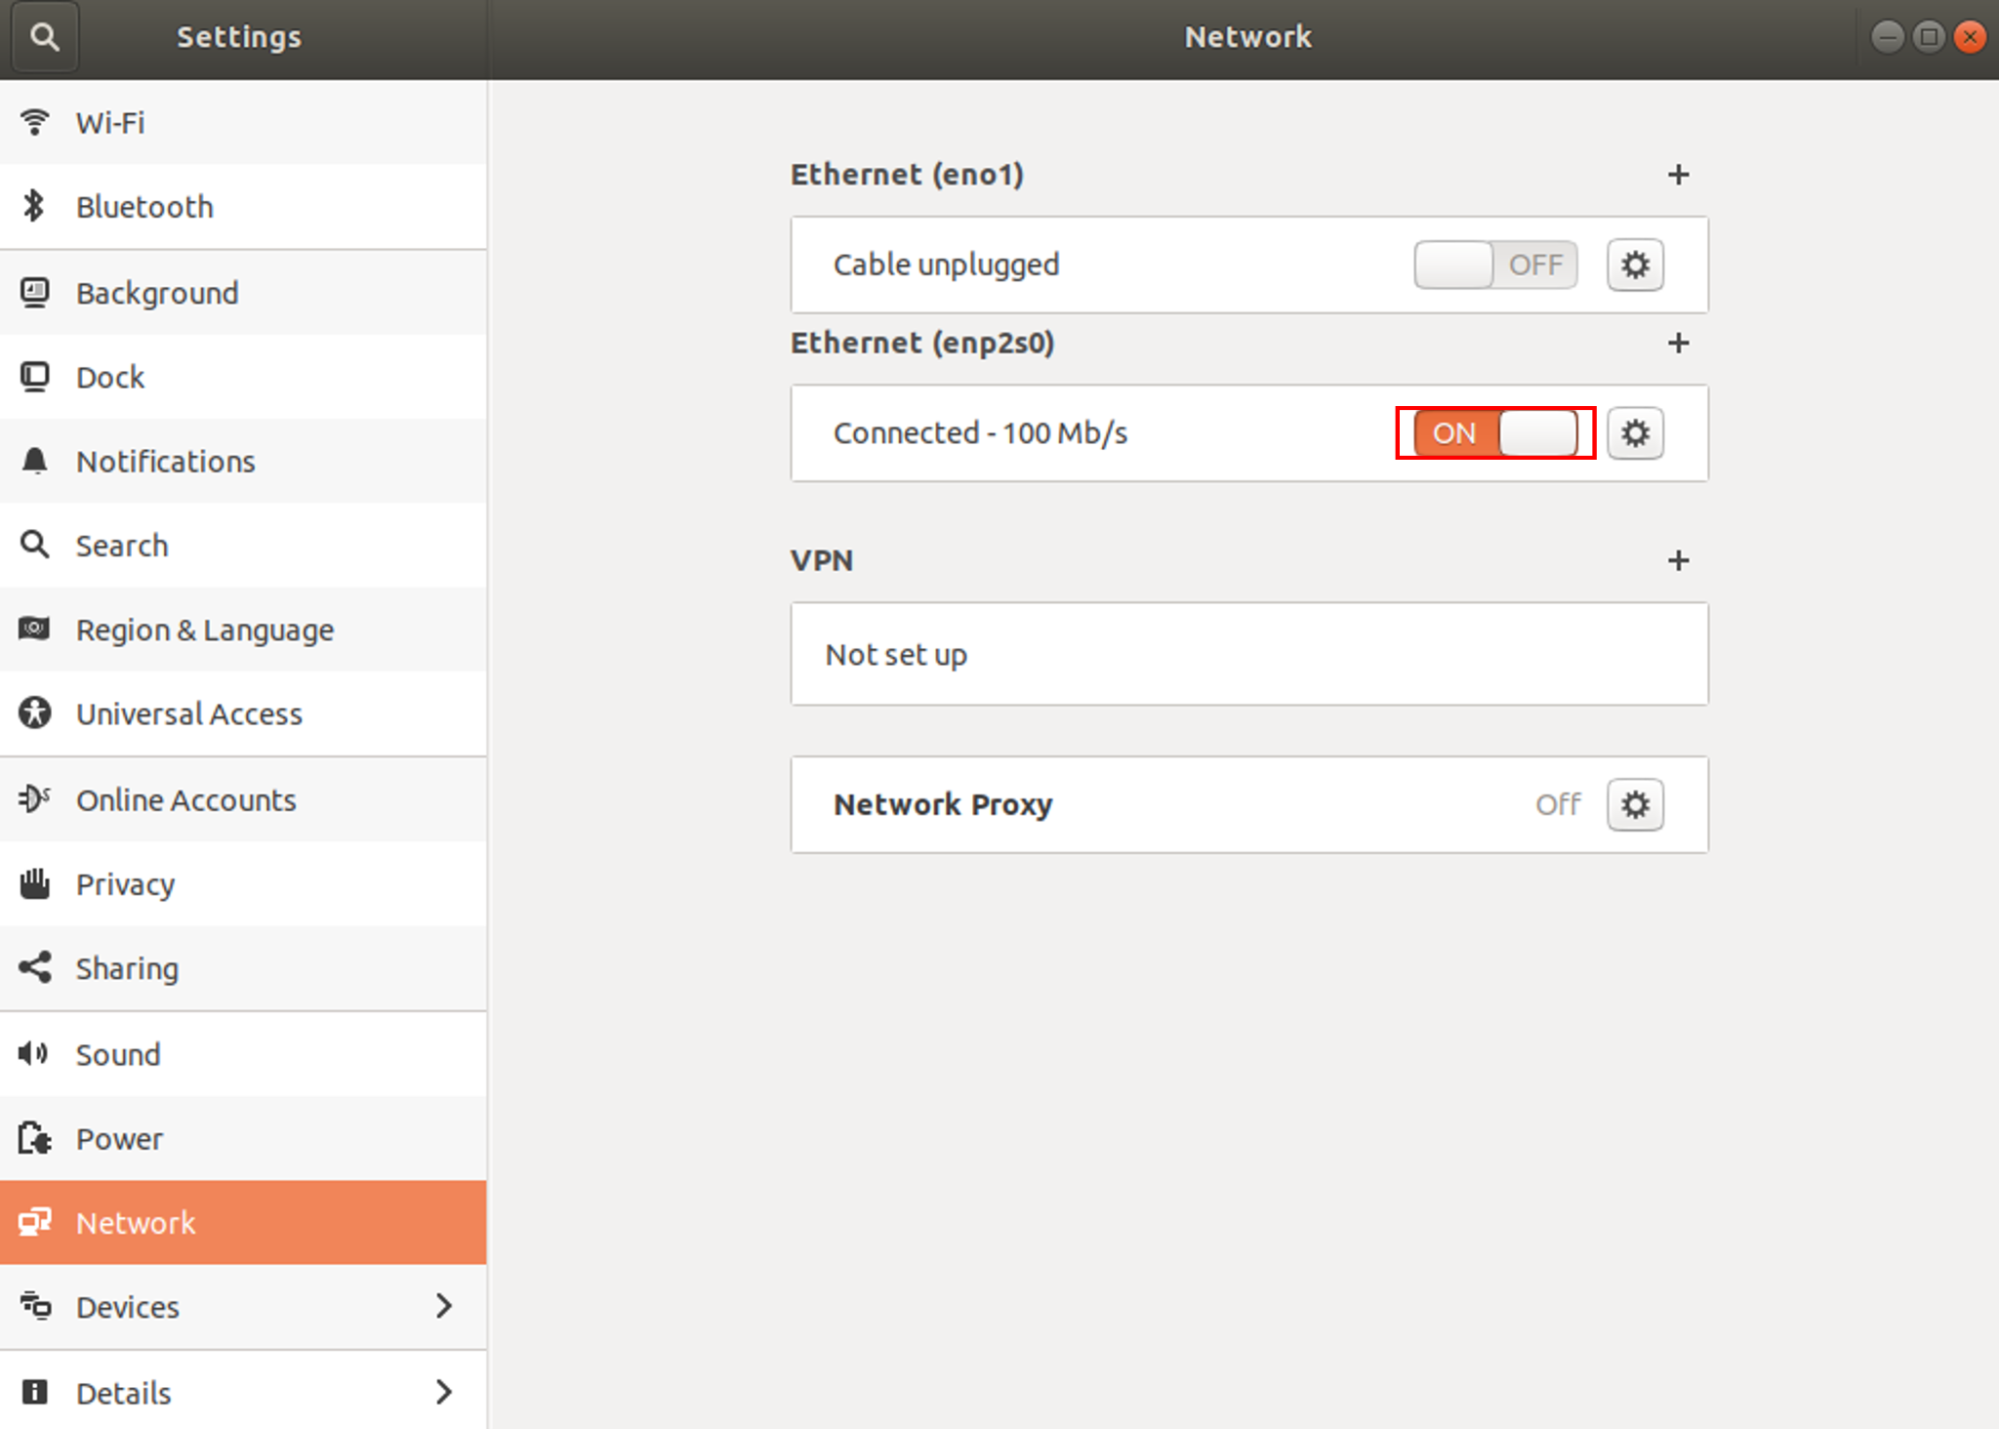
To find the network settings of the LPU, click the network icon at the top-right of the desktop
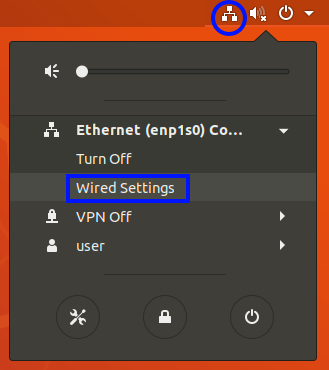
This will open the settings menu. If no ethernet cables are connected to your LPU, it is possible no network actually shows up in this menu. To get started, plug in your ethernet cable that has internet access into ‘LAN 2’ of the LPU. You should see the lights next to the connector turn orange and blink yellow if your connection is successful
caution
If the network icon does not exist, check if Lidar's LAN cable connected to LPU correctly
Click on ‘Wired Settings’ If you require this LPU to have internet or office network access, set this ethernet adapter up to connect to the internet. The most standard way is to set it up as ‘Automatic (DHCP)’, but your network may be different
Click ‘Apply’
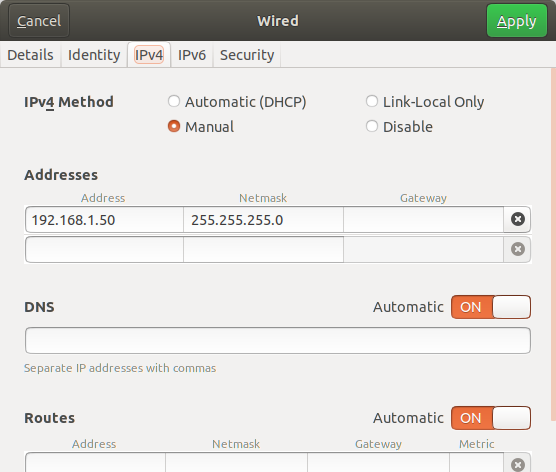
Click on the gear icon next to the second ethernet adapter called ‘enp2s0’. For Hesai Lidar, IP 192.168.1.XX can be used as a destination IP access. http://192.168.1.201 in your web browser if you want to modify destination IP
Check that your network is set up as the image below. And make sure to turn off and on again after changing the setup to refresh the network setup.
Step 6. Create a SENSR Project
Either click ‘New Project’ on the SENSR introduction screen or select ‘New Project’ from the File menu if you already created a project before, like the tutorial for example
Call this project ‘test’ and click ‘done’ You will notice a new project has been created with a Sub Node.
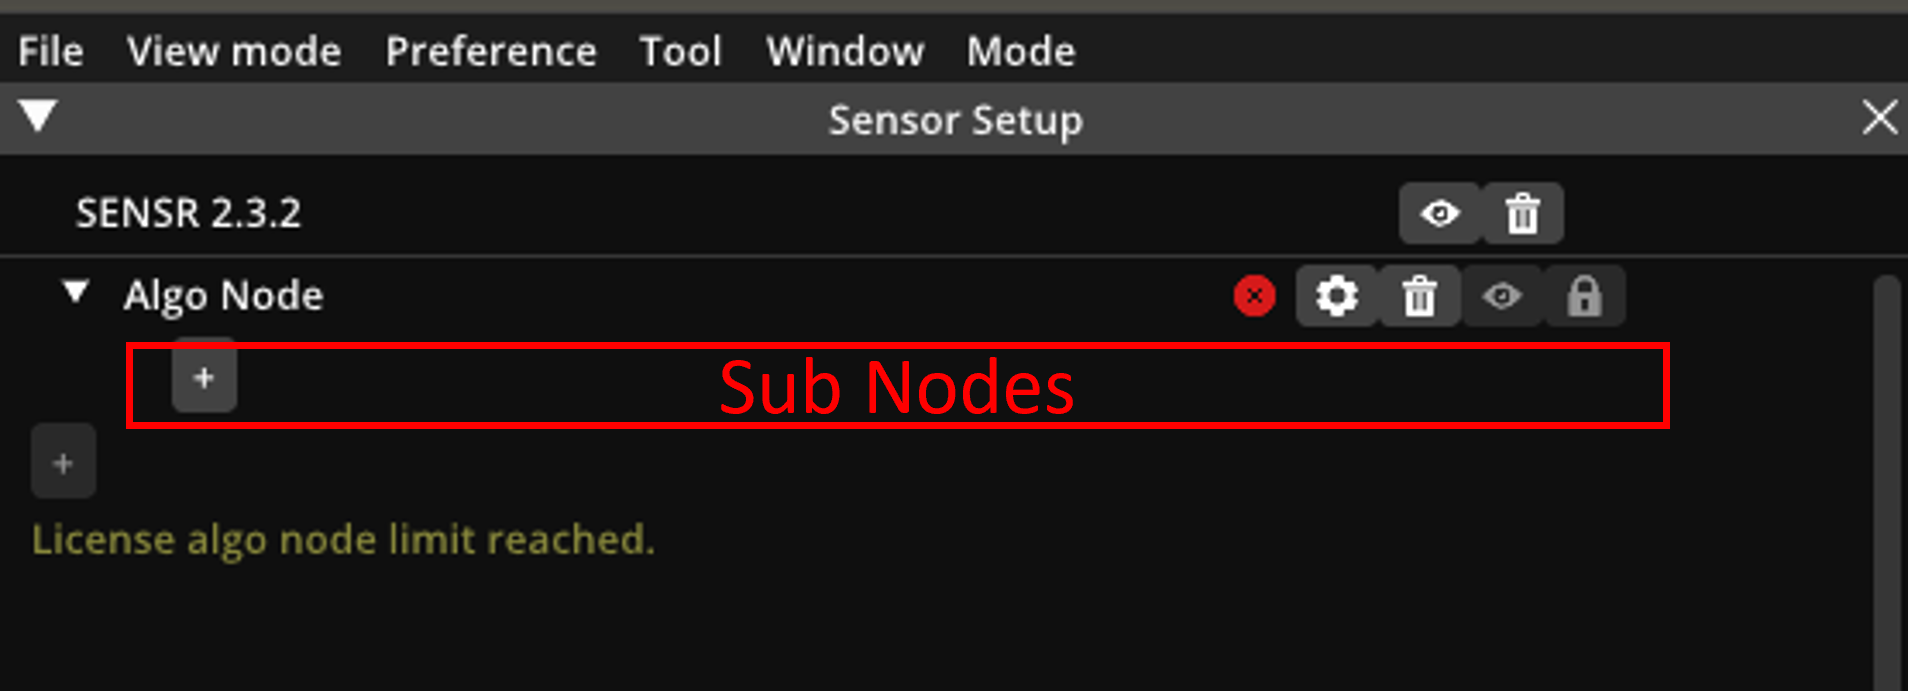
3. Open the sub node by clicking the arrow in front of it
3. Open the sub node by clicking the arrow in front of it
Click the '+' button directly below the Sub Node. This adds a new lidar
Click ‘Lidar’ (If you want to connect another LiDAR, refer to here)
Click ‘Hesai XT-32’
You can rename the sensor to whatever you want
Enter Default IP address and port of lidar like the below image
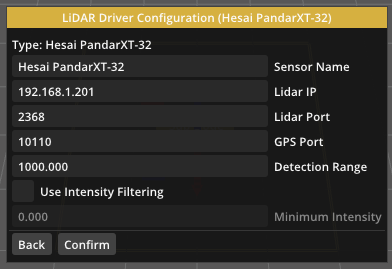
- Click ‘Confirm’
- Click ‘Start Algo Nodes’ at the bottom of the screen The check-box before the ‘Sub Node’ should turn green immediately and after a couple of seconds the Sensor checkbox should also turn green and a point cloud shows up in the 3D window.
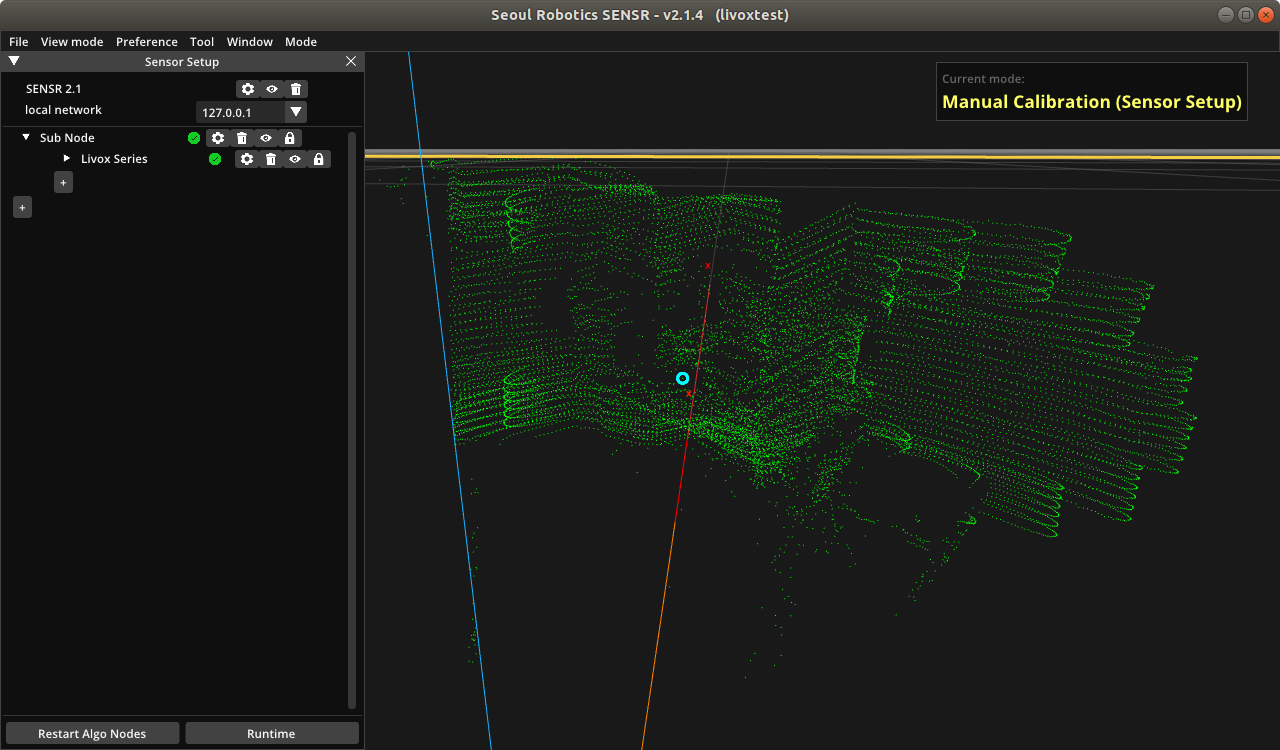
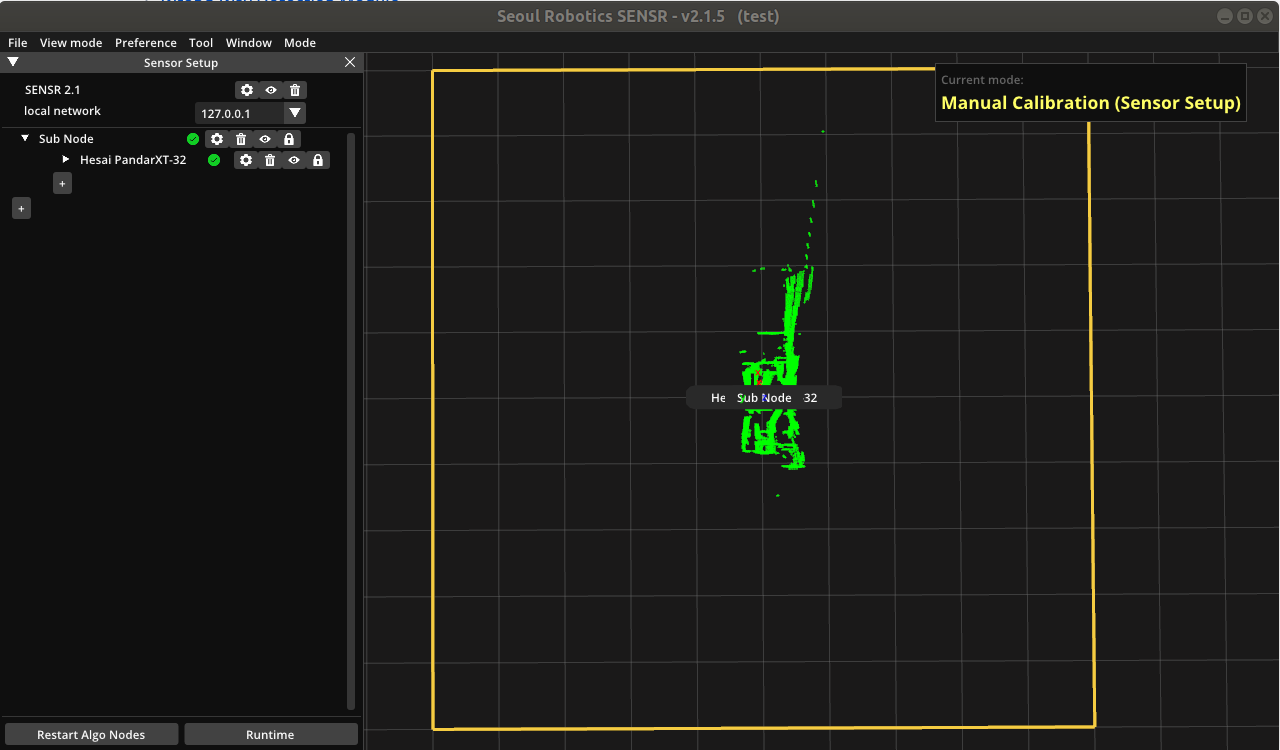
tip
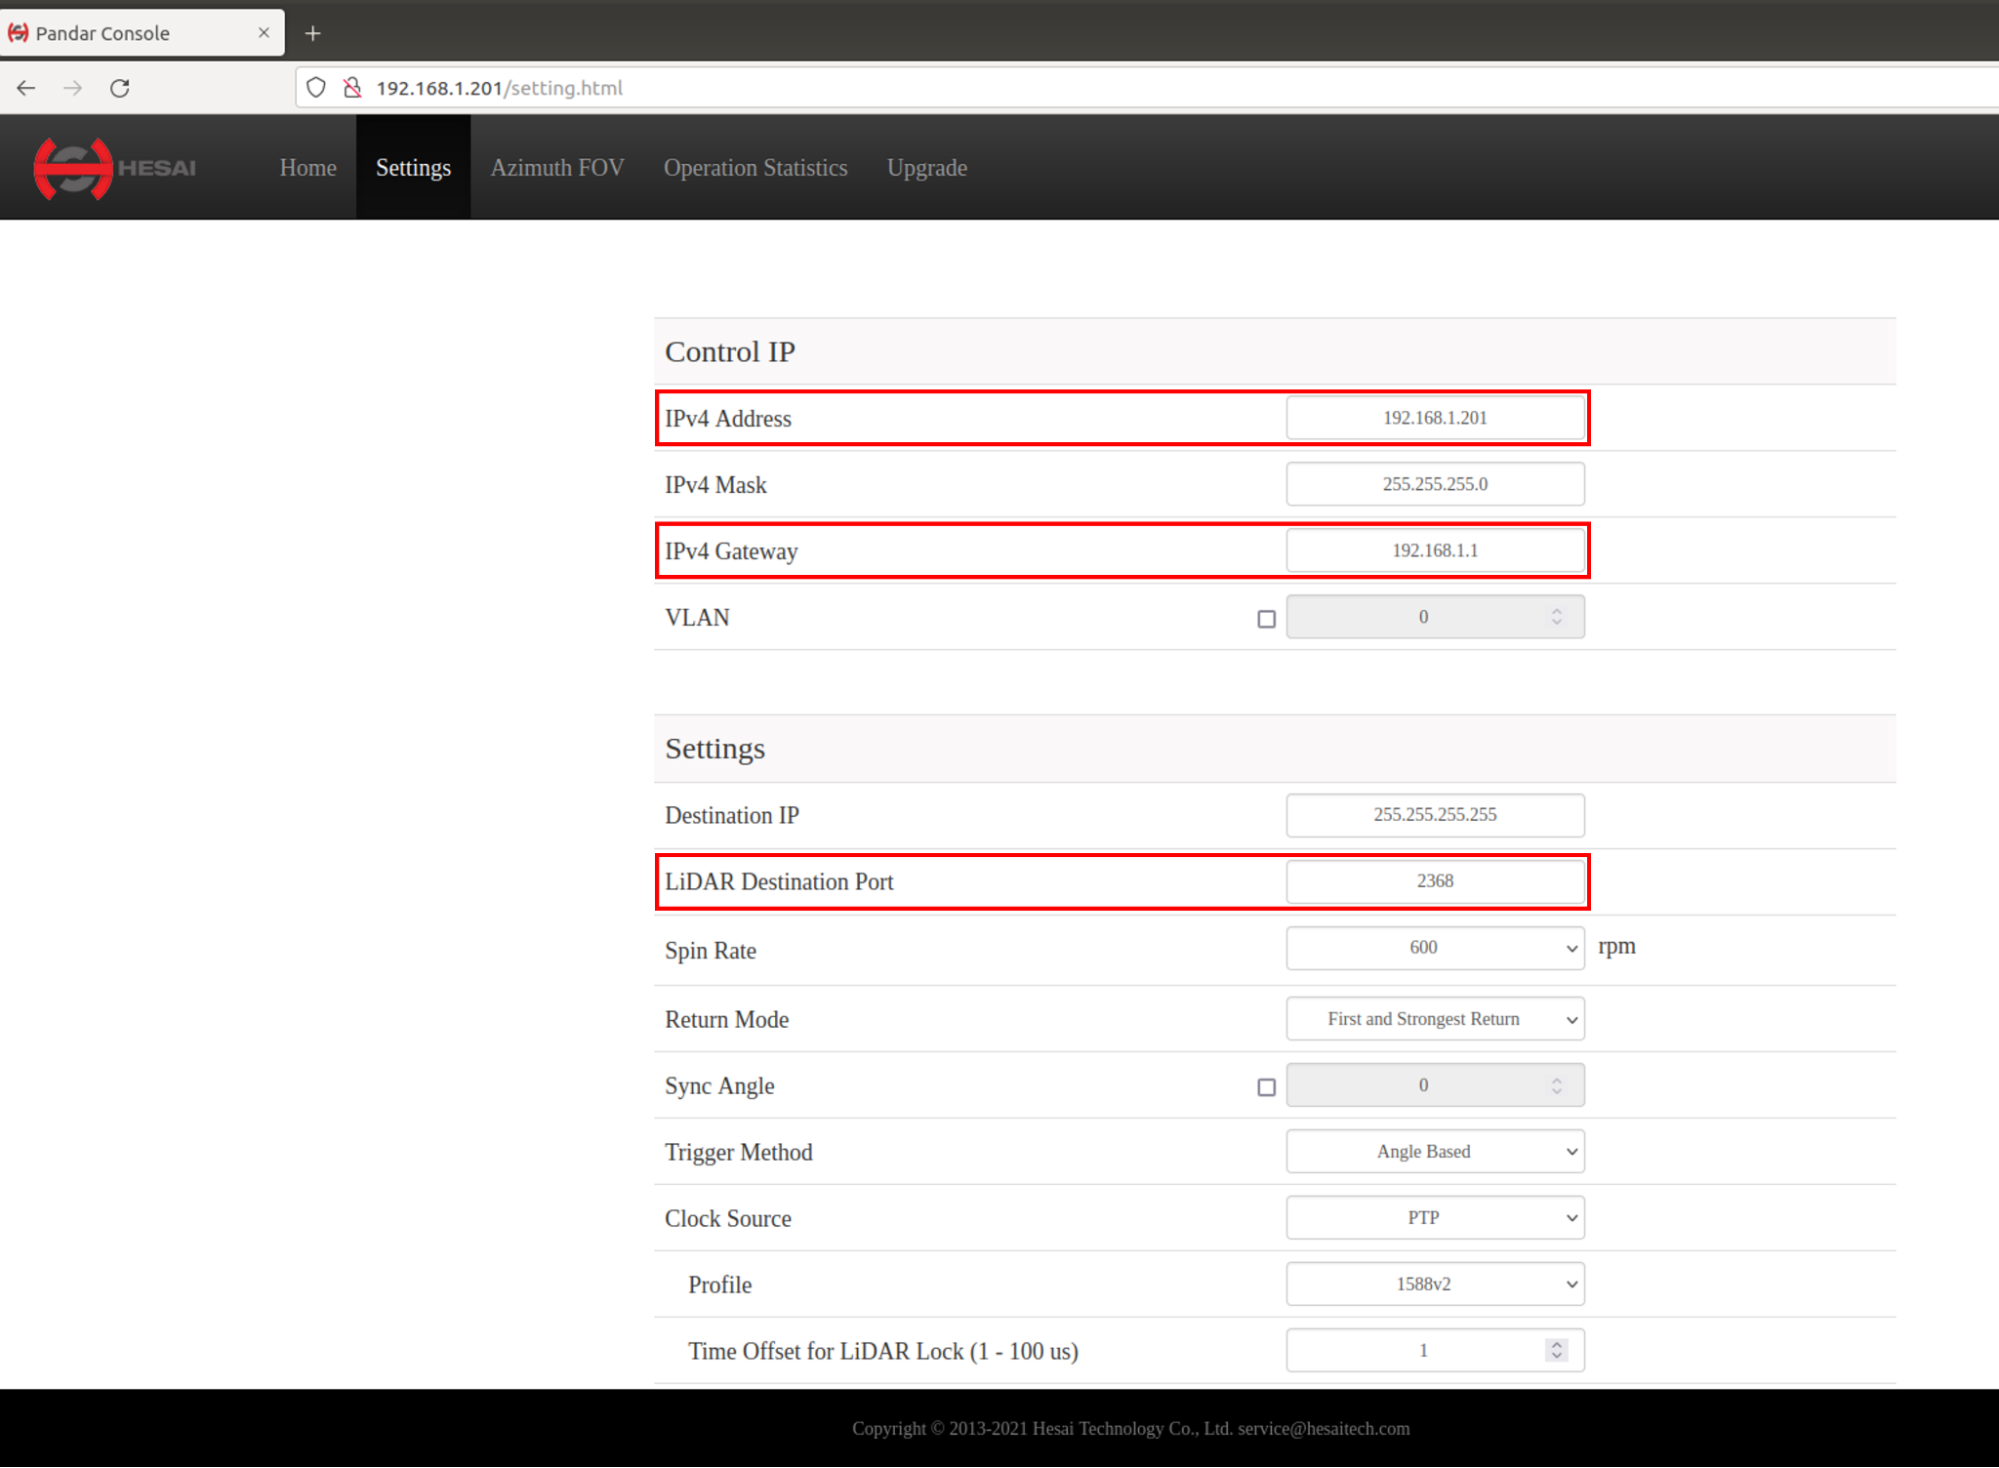
If you have multiple lidars, modify lidars’ port numbers to be different respectively at Lidar Setting page like below image (http://192.168.1.201)
Change those values respectively: IPv4 Address, IP4v Gateway, LiDAR Destination Port
Step 7. Calibration
This next step is the calibration procedure. This is covered in detail in Calibration of the manual.
Congratulations, you have now connected and calibrated your first sensor.
Configuration window
Ouster OS1-128
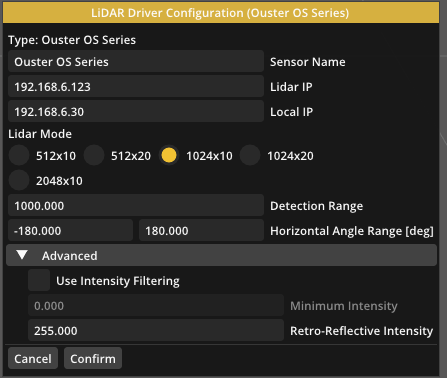
- Local IP
- Enter the IP address of the LPU.
- Lidar Mode
- It is the part that set up the resolution.
- Ouster driver takes a little time to connect compared to other Lidars.
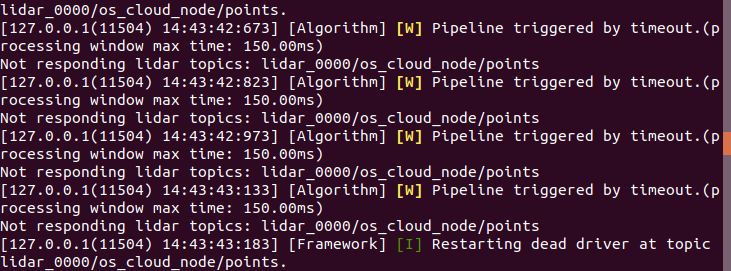
- The ouster LiDAR is not connected for a few minutes and appears this message on the terminal.
- Use the method as below
- Settings → General Parameter → Common → Input

- Enter a number higher than 7 (The default value is 7)
- Settings → General Parameter → Common → Input
- The ouster LiDAR is not connected for a few minutes and appears this message on the terminal.
Falcon
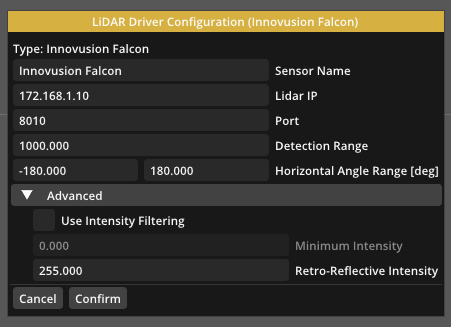
- Port Number must be fixed at 8010.
- If you change the port number, you can see this error.
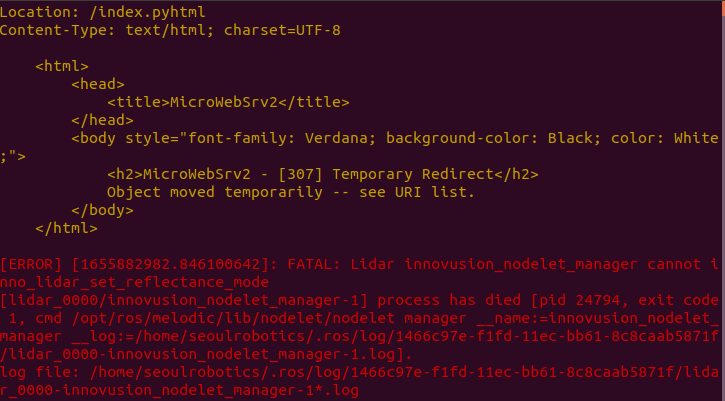
- If you change the port number, you can see this error.
Aeye
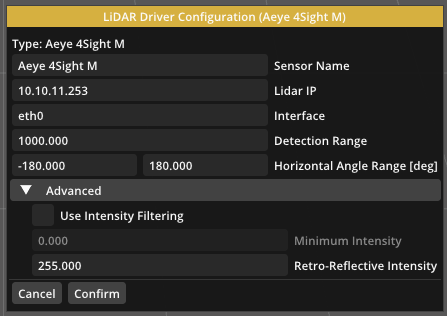
- interface
- Keep the default settings value.