Advanced Installation
Advanced Installations, Remote Installations
SENSR is designed to be remotely accessible. The software consists of two components: the algo node and the master.
caution
It is strongly recommended to start with a single computer installation before attempting to install a remote installation and distributed systems.
Algo Nodes
The Algo Node, short for ‘algorithm node’, is the process where all the heavy number crunching takes place. Sensors connect to algo nodes which process this information and send this processed information to the Master. An algo node is able to reduce the raw data bandwidth coming from the sensors by over 95%. An algo node does not have a visual interface and can be configured to start automatically when the computer is powered.
Master Server
The Master Server performs several functions.
- It receives and processes information from the algo node.
- It manages the Graphical User Interface, which contains all tools needed to control the system such as project management, sensor setup and calibration.
- It serves as the single point of contact for data and interaction for client systems.
Setting up a Remote Algo Node
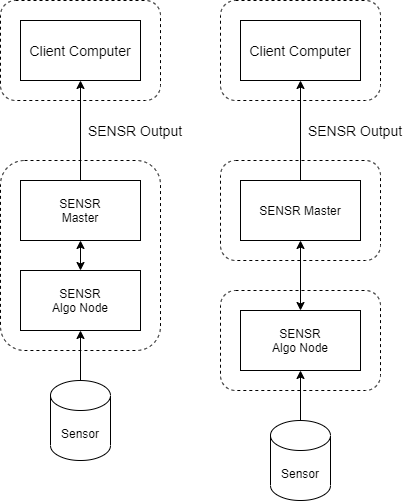
It is possible to install an Algo Node on a different computer than the Master Server. There are a couple of reasons why this is useful.
First, this allows for remote access to multiple sites from a single Operations computer. Each site can be managed as an independent project (see Projects Setup)
Second, this allows for a large site to be spread across multiple computers to balance the load of processing many Lidar sensors In this instance a single Master is connected to multiple Algo Nodes simultaneously.
Algo Node Authentication
Before the Master and the Algo Node can communicate, the Master will have to register with each algo node. To do this, an SSH based authentication must be established.
caution
Before you attempt to establish the SSH authentication, first make sure that the network configuration of the Master and Algo Nodes is set up so the computers can ping each other. This means that both need to be on the same network and be part of the same subnet.
Create the SSH key on the Master(done once)
- Open a terminal (CTRL-ALT-T shortcut)
- Type:
ssh-keygen - Use the default location and just hit enter when asked for a pass-phrase
caution
If the prompt asks you to overwrite a previous SSH key, you must answer ‘no’. Otherwise any previously set up communication channels may be lost.
Copy the SSH key to the Algo node(done once for each Algo Node)
- Find the IP address and the user login of the Algo Node. In this example we will use 10.0.0.240 and the user login is ‘discovery’
- Type:
ssh-copy-id discovery@10.0.0.240
It may show a message like this:
    The authenticity of host '10.0.0.240 (10.0.0.240)' can't be established.
    ECDSA key fingerprint is fd:fd:d4:f9:77:fe:73:84:e1:55:00:ad:d6:6d:22:fe.
    Are you sure you want to continue connecting (yes/no)? yes
- Type:
yes
Next it will ask you for the password of the login of the Algo Node
- Type in the password of the login of the Algo Node
You should now see a message like this:
    Number of key(s) added: 1

    Now try logging into the machine, with:   "ssh discovery@10.0.0.240'"
    and check to make sure that only the key(s) you wanted were added.
Follow the given instructions. If the login succeeds, the connection and authentication is set up correctly.
If you run into any issues, a in-depth explanation of how to configure SSH authentication can be found here at this link
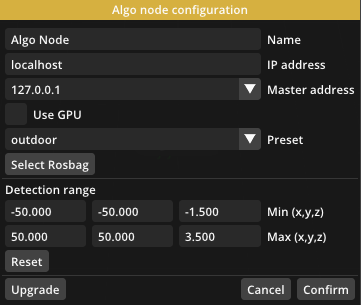
Installing a Dedicated Algo node
Follow instructions in Sensor setup for the remote algo node connection. And click the ‘Upgrade’ button at the bottom in Algo Node configuration popup.
If Upgrade is available, You will see the below screen

If you click ‘Upgrade’ button, Master Node automatically copies all the necessary files into the connected algo node and asks you to run the installation step.
Larger Installations
In larger installations you may need multiple routers to handle the connections to all the sensors.
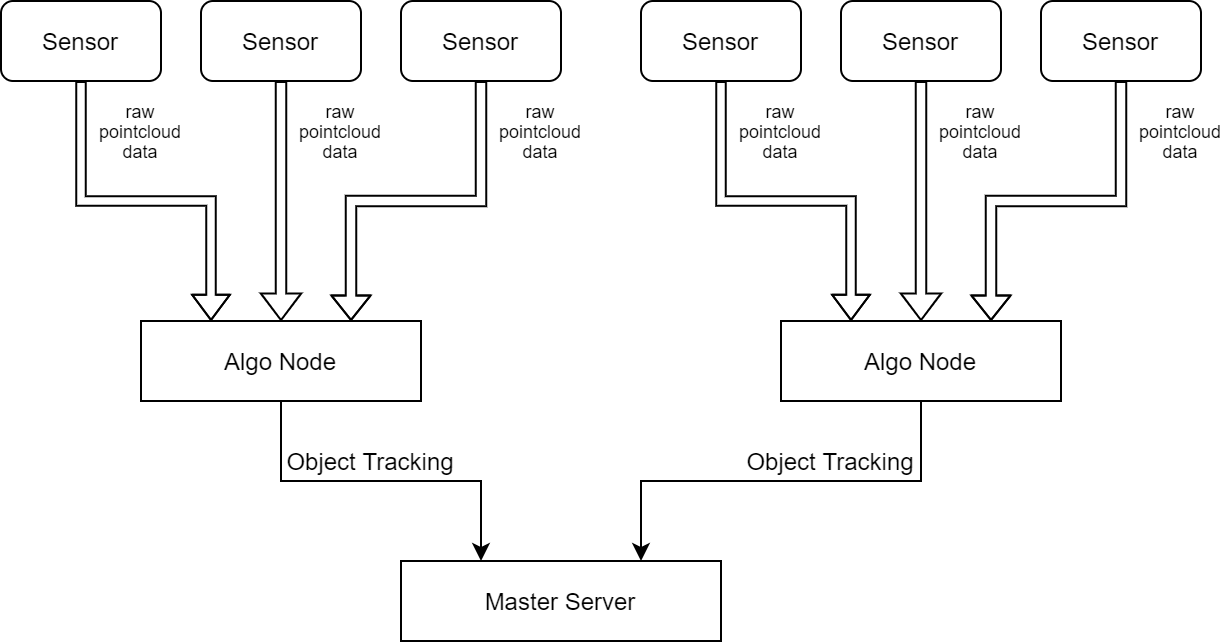
SENSR supports distributed computing. This makes it possible to connect a large number of sensors and distribute the load of processing the data over multiple computers. Each of these computers is called an Algo Node.
In addition to processing the raw data from the sensors, these Nodes reduce the network bandwidth by up to 95%. These Nodes report their processed data to a single computer called the ‘Master Server’, which is where the system is configured and monitored and from which the output data is streamed.
caution
Be aware that LiDAR sensors generate large amounts of data. The bandwidth used by a 32-beam sensor can be up to 50Mbps. Consult your LiDAR manual for the bandwidth for your units. As a general rule of thumb, a standard 1 Gbps network should not be loaded above half of its capacity to ensure that data is not delayed. This means that a router that is rated for 1 Gbps cannot handle more than 10 standard 32-beam LiDAR units.
If you see flashing point clouds in the SENSR software, this can be caused by network traffic overload.
Large Installations Strategy
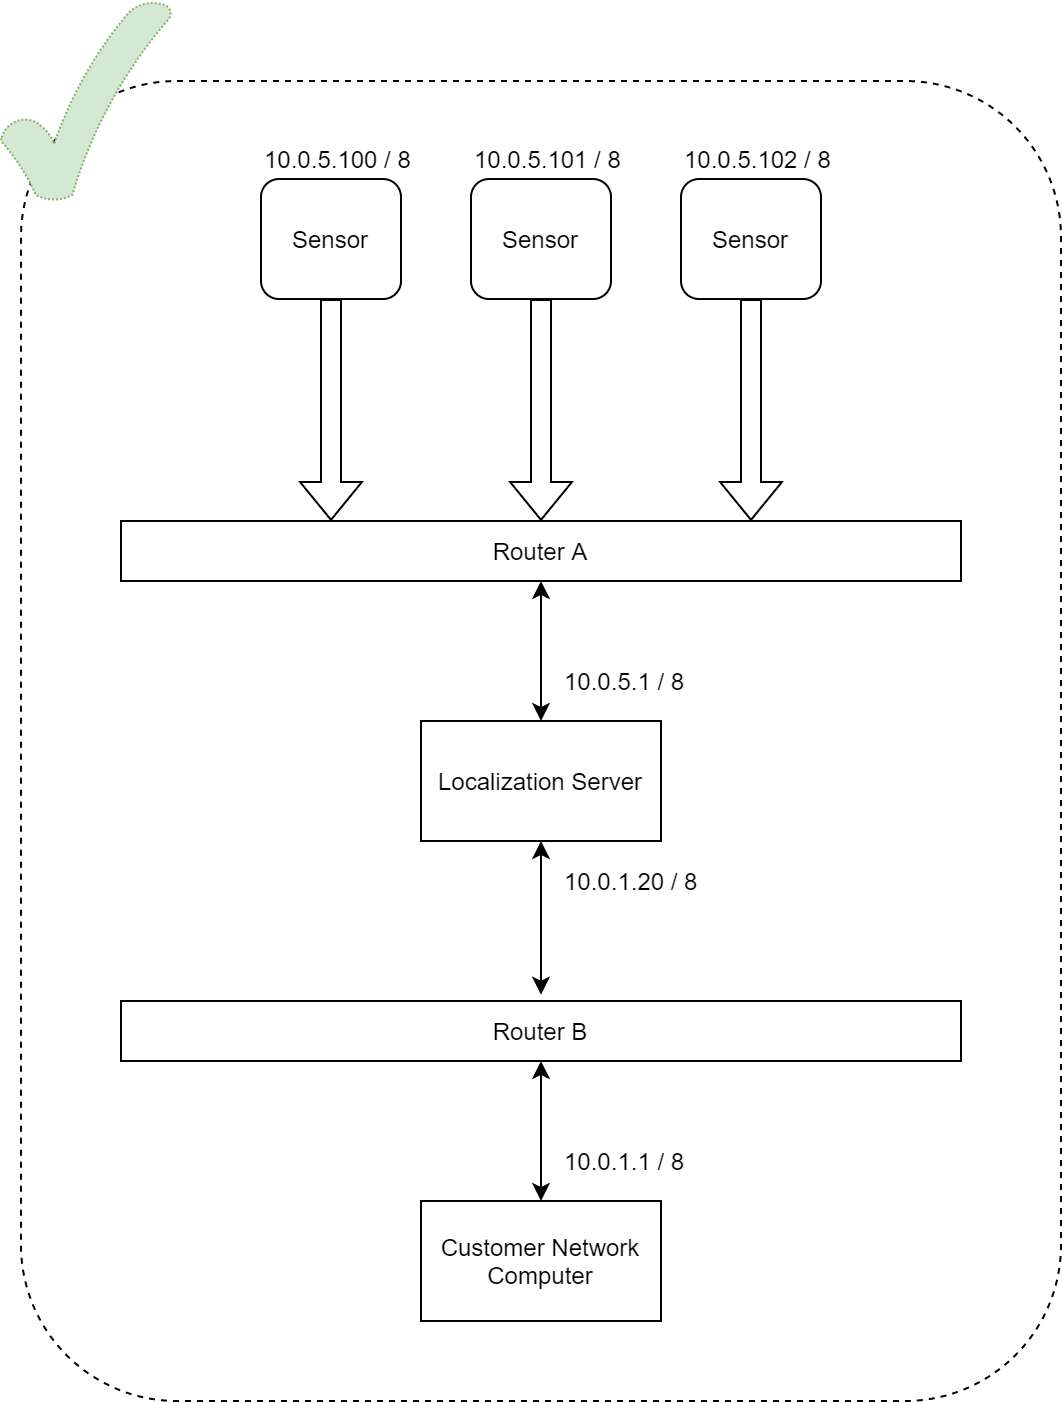
It is strongly recommended to use a static IP strategy when designing and operating large installations. All communications are IP based, including the Lidar sensors and Seoul Robotics cannot guarantee that the sensors will operate in a DHCP environment. A re-assignment of IP addresses due to a reset of the DHCP server, for example, may cause the entire sensor setup and calibration to be lost.
It is also recommended to separate the sensor network from the client network. This will ensure that the sensor traffic will not flood the client network and only the Master Server has access to the sensors.
In this example, the sensor network is on subnet 10.0.5.XXX with a mask of 255.255.255.0 and the client network is on 10.0.1.XXX with a mask of 255.255.255.0. No computer on the client network will be able to directly reach the sensors and vice-versa