Record & Replay
Overview
SENSR-I supports recording feature that saves raw input streams of the sensors into a file. This file can be used to replay the recorded data at a later time.
Purpose
This is useful for following purpose:
- To check the data and perform parameter tuning in a separate space without physical sensor connections
- To store the data for archiving
- To provide the data as a reference to get technical support from Seoul Robotics
Saved location
The recorded file will be saved in /opt/seoulrobotics/rosbags folder of each Algo node machine.
For example, if you record the data in the setup of Algo node A and B in Machine 1 and Algo node C in Machine 2, the recorded files will be saved as below:
- Data of Algo node A and B under
/opt/seoulrobotics/rosbagsof Machine 1 - Data of Algo node C under
/opt/seoulrobotics/rosbagsof Machine 2
How to Record
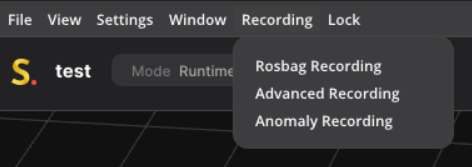
There're three features to record the data:
- Rosbag Recording
- Advanced Recording
- Anomaly Recording
You can find those features at Recording menu in menu bar, or you can click the Record icon(this is shortcut to use Rosbag Recording) on the header.

1. Rosbag Recording
This feature can be supported only with live sensors. Rosbag Recording is disabled if you use recorded data to run SENSR-I. The feature is accessible in project mode or Runtime mode. If a first recording failed in Runtime mode, it is then recommended recording data in Project mode to reduce the computing power consumed by SENSR.
Steps to use this is as below:
Click
Recordicon on the header orRecording > Rosbag Recordingon the menu barSet configuration of recording.
File name: The name will be used for distinguishing the recorded file. The folder with input name will be created under/opt/seoulrobotics/rosbagsfolder of each Algo node machine.- filename has the following restrictions:
- Filename must not contain spaces.
- Special characters cannot be used in filename. (except "_")
- Filename must start with an alphabet.
- filename has the following restrictions:
Max Recording Time: This is an optional field. So if you want limit the maximum recording time, you can set the value by ticking the checkbox. Once SENSR has been recording for this amount of time, it automatically stops the recording and saves it. The recording can be manually stopped at any point before that, but this parameter is intended to limit the recording time in case there is limited space of storages or if the user wants to record the data of a specific amount of time.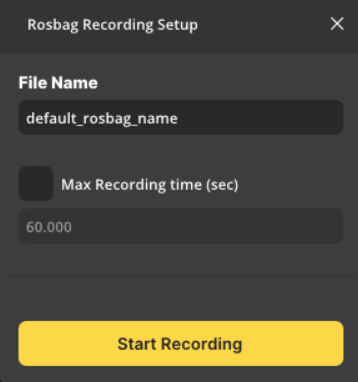
Click
Start Recordingbutton to start recording. The recording window will show information about the recording and percentage of recorded time in comparison with Max Recording Time, if it's set.Press the
Stop Recording buttonat any time will stop the recording and save to file. The recording system also keeps track of the available disk space and automatically turns off the recording if there is not enough space remaining.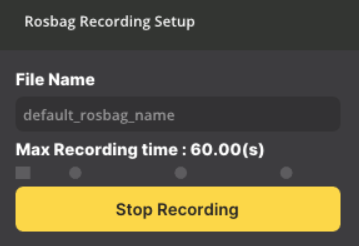
info
Advanced Recording and Anomaly Recording don't output file format as .bag. Users can not use recorded data of those two feature in SENSR-I. These features would be used only for customer support, since it saves more information which enables Seoul Robotics to investigate further. Please use them when requested by Seoul Robotics' Support Engineer.
2. Advanced Recording
Advanced Recording is almost the same as Rosbag Recording. The differences are that it saves the data in a different format and Circular recording is supported in Advanced Recording.
- It saves data frame by frame as
.binfiles. - If
Circular recordingis ticked on, it saves data from the frame which is process certain amount of time ago to when the recording is stopped. In other words, it doesn't save all data from the beginning of recording to give us only useful data and to save the storage space.
Step to use this is as below:
Click
Recording > Advanced Recordingon the menu barSet configuration of recording.
Folder name: The name will be used for distinguishing the recorded file. The folder with input name will be created under/opt/seoulrobotics/rosbagsfolder of each Algo node machine.Select Target Algo Node(s): Select the Algo node(s) to record.Master Node Record: Whether to save the exact output of Master node. If it's enabled, it can be used for Master Node Replay.Rosbag Record: Whether to save with rosbag format.Output Merger Record: Whether to record how Algo node outputs are merged.
Circular recording: If this is ticked on, it saves data from the frame which is process certain amount of time ago to when the recording is stopped as described above.Circular Recording time(s): The amount of time to save data. If it is 60 seconds and clickStop Recordingat timestamp A, then data will be saved from A - 60 seconds to A. This is only available whenCircular recordingis ticked on.
Transfer Recordings: If ticked, recording files from remote Algo node will be transferred to the Master node machine.
Click
Start Recordingbutton to start recording.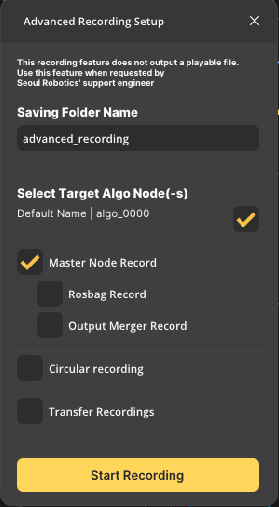
(Optional) Click
Make a Snapshotif you want to snapshot for the specific frame.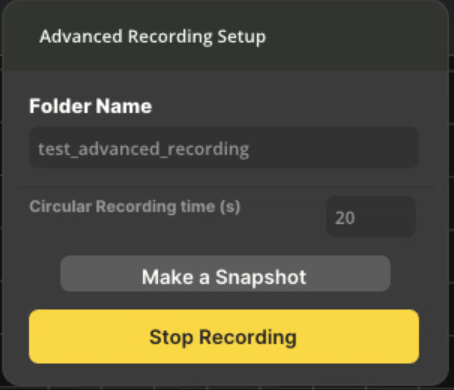
Click
Stop Recordingbutton when you want to stop recording.
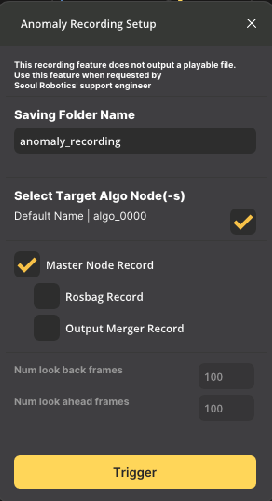
3. Anomaly Recording
Anomaly Recording can be used when you want to record the data from a certain point forward or backward of a specific event (ex. when noise occurs in object recognition, when an event to be observed, such as vehicle entry) occurs. In the case of Rosbag Recording and Advanced Recording, users need to start recording in advance and continues to wait for the corresponding event to occur. After that, users need to manually Stop Recording after checking the occurrence of the event through the GUI. However, the Anomaly Recording function keeps the frame in the background and when a user discovers an event, presses the Trigger button to automatically save the data before and after that point.
Steps to use this is as below:
Tick on
Enable Anomaly Data-CollectorinSettings > General > Data Collection > Anomaly Collectorto enable SENSR to save frames in the background. And adjust values ofNum Look-Back FramesandNum Look-Forward Frames.Num Look-Back Frames: The number of frames to save before the trigger. SENSR mostly saves 10 frames per second, so if you set 10, it will save 1 second of data before the trigger.Num Look-Forward Frames: The number of frames to save after the trigger.
Click
Apply, then Algo nodes will be restarted and SENSR will keeps the frame in the background.Click
Recording > Anomaly Recordingon the menu bar.Set configuration of recording.
Folder name: The name will be used for distinguishing the recorded file. The folder with input name will be created under/opt/seoulrobotics/rosbagsfolder of each Algo node machine.Select Target Algo Node(s): Select the Algo node(s) to record.Master Node Record: Whether to save the exact output of Master node. If it's enabled, it can be used for Master Node Replay.Rosbag Record: Whether to save with rosbag format.Output Merger Record: Whether to record how Algo node outputs are merged.
Num look back frames: It will be the same value asNum Look-Back FramesinSettings > General > Data Collection > Anomaly Collector.Num look forward frames: It will be the same value asNum Look-Forward FramesinSettings > General > Data Collection > Anomaly Collector.
Replaying
Replaying recorded data saved through Rosbag Recording is not supported as a separate function. When setting Algo node in Project Setup, replay is possible by loading .bag file.
While replaying rosbags, you can focus on specific part if needed:
In Runtime mode navigate to
Settings > Advanced features > Customize Rosbag Playback,Click and drag the cursors on the left and right to define which portion of the rosbag to play,
Click on
Apply.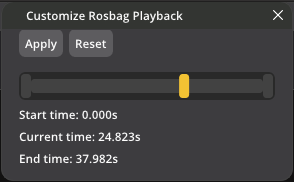
Note: If you want to reset the playing range, in Settings > Advanced features > Customize Rosbag Playback, select Reset.
Master Node Replay
If a rosbag file has been saved using Advanced Recording or Anomaly Recording with the Master Node Record option enabled, you can use Master Node Replay. This feature allows you to recreate the same output that was present in Live Runtime mode.
How to use
- Navigate
Tool > Master Node ReplayinProject Setupmode. - Select the rosbag file which is saved using
Advanced RecordingorAnomaly Recordingwith theMaster Node Recordoption enabled. The file will be located under/opt/seoulrobotics/recording/<recording-name>/master_datafolder of the Master node machine. - Click
Startto begin the replay. This mode operates similarly to theRuntimemode, where you can retrieve output data.
Transfering the recorded data
SENSR's recording features save the recorded data in the machine where each Algo node is running. To enable the user to easily transfer the recorded data, SENSR provides Transfer Recordings option.
But if there's any issue in transferring the recorded data, you can continue it in Settings > Advanced Features > Recording Transfer by clicking failed transfer item.